Photo:
Andrew
Liszewski
/
Gizmodo
AirPods
have
taken
the
consumer
audio
industry
by
storm
and
successfully
entered
most
households.
There’s
a
chance
that
most
of
us
(like
me)
have
never
tried
to
look
into
everything
they
can
do.
Let’s
look
at
those
hidden
features
we
didn’t
know
about
one
of
the
planet’s
most
popular
pairs
of
buds.
See
Airpod
deals
at
Best
Buy
Screenshot:
Dua
Rashid
/
Gizmodo
AirPods
features
a
Live
Listen
feature
that
you
can
use
to
listen
to
a
conversation
happening
in
another
room.
This
feature
works
regardless
of
your
AirPods
model.
All
you
have
to
do
is
head
over
to
Settings
on
your
iPhone,
navigate
to
Control
Center,
and
tap
the
green
plus
icon
next
to
Hearing
on
the
list.
This
will
make
it
easier
for
you
to
access
the
feature
with
just
a
swipe
down.
Then,
put
your
AirPods
on,
tap
the
Hearing
icon
in
your
Control
Center,
and
tap
the
Live
Listen
button.
This
will
enable
live
listening
for
you.
All
that’s
left
to
do
is
place
your
phone
in
the
room
of
your
choice.
This
feature
can
help
with
attending
meetings
that
are
happening
in
another
room.
Screenshot:
Dua
Rashid
/
Gizmodo
This
is
another
feature
that’s
supported
on
all
AirPods
models.
You
and
a
friend
can
connect
two
pairs
of
AirPods
with
the
same
iPhone
(or
iPad)
to
listen
to
music
together.
Connect
your
AirPods
to
your
iPhone
or
iPad
(whichever
app
you’re
listening
to
music
on),
tap
the
AirPlay
button,
and
then
tap
Share
Audio.
Next,
bring
your
friend’s
AirPods
close
to
your
device
with
the
buds
inside
the
case
and
the
lid
open.
When
your
friend’s
AirPods
appear
on
your
screen,
hit
Share
Audio.
This
will
connect
your
AirPods
with
your
iPhone
and
is
a
fun
way
to
share
music
or
other
media.
Screenshot:
Dua
Rashid
/
Gizmodo
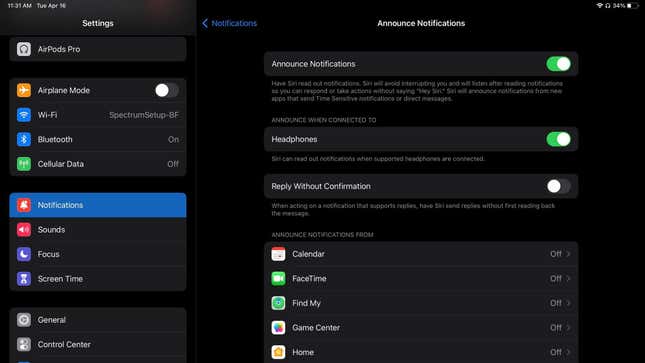
Siri
can
announce
all
your
message
recipients
and
text)
and
calls
in
your
AirPods.
For
messages,
go
to
Settings
>
Notifications
>
Announce
Messages
with
Siri
and
turn
the
toggle
switch
on.
Siri
will
announce
the
contact
name,
followed
by
a
message.
Navigate
to
Settings
>
Phone
>
Announce
Calls
>
Headphones
only
for
calls.
The
next
time
someone
calls
you,
Siri
will
announce
the
contact
name
in
your
AirPods.
Screenshot:
Dua
Rashid
/
Gizmodo
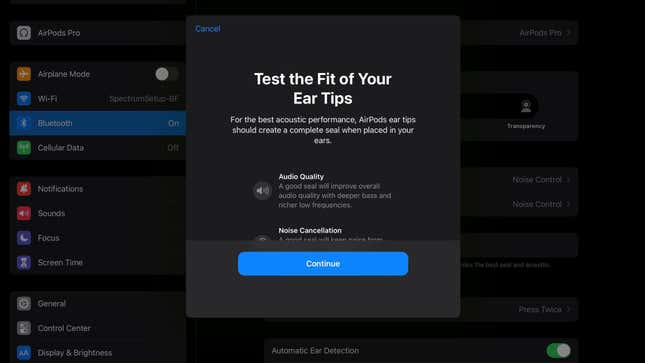
To
make
sure
you
get
the
ideal
listening
experience,
you
can
take
a
quick
ear
tip
fit
test
on
your
iPhone.
This
will
tell
you
if
you’re
wearing
the
right
ear
tip
size.
If
not,
you
can
replace
them
with
another
size
in
the
box.
Head
to
Settings
>
Bluetooth
and
look
for
your
AirPods
on
the
list.
Tap
the
info
icon
next
to
their
name
and
hit
Ear
Tip
Fit
Test.
Click
Continue
to
start
the
test.
Your
iPhone
will
play
some
music,
take
a
few
seconds,
and
let
you
know
if
the
size
you’re
wearing
is
right
for
you.
You
can
see
where
exactly
your
AirPods
(any
model)
are
when
you
lose
them,
and
if
you
own
the
AirPods
Pro
2nd
Gen,
you
can
also
locate
their
charging
case.
Just
go
to
the
Find
My
app
on
your
iPhone
and
choose
your
AirPods
from
the
list
of
connected
devices.
For
situations
where
you
lose
a
single
bud
(which
happens
far
too
often),
you
can
separately
click
on
left
or
right—whichever
bud
you
lost.
If
you’re
an
AirPods
Pro
2
owner,
you
can
click
on
the
charging
case
to
locate
that.
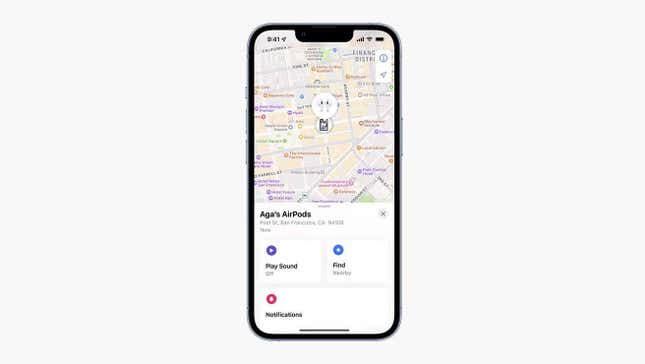
Your
Find
My
app
can
help
you
in
two
ways.
It
will
locate
your
AirPods
on
a
map,
which
would
be
helpful
if
they’re
far
from
where
you
are.
The
app
also
offers
a
Play
Sound
option
under
the
map
that
you
can
tap
to
make
your
buds
or
case
ring
out
loud.
This
helps
when
you’re
within
hearing
distance
of
them
and
can
follow
the
sound.
Photo:
Dua
Rashid
/
Gizmodo
Some
of
us
might
have
missed
adding
a
little
lanyard
loop
introduced
on
the
AirPods
Pro
2nd
Gen.
It’s
a
minor
update
that
can
be
incredibly
helpful.
It
makes
your
AirPods
attachable
to
pretty
much
anything
with
a
loop.
You
can
fasten
them
to
your
backpack
or
keychain.
This
is
a
good
way
to
ensure
you
don’t
lose
them
as
often
and
doubles
as
a
nice
accessory.
Screenshot:
Dua
Rashid
/
Gizmodo
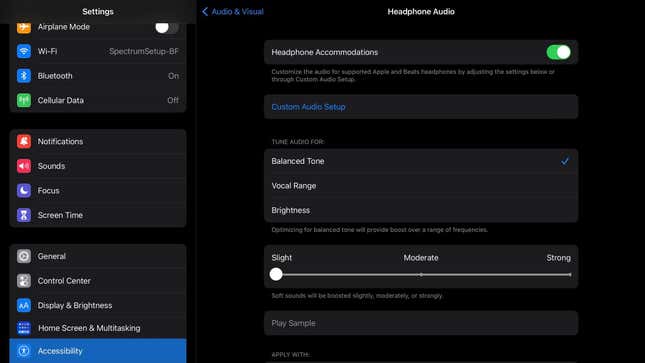
If
you
go
into
Settings
>
Accessibility
>
Audio
&
Visual
>
Headphone
Accommodations,
you
can
tweak
your
music
according
to
your
preferences.
Start
by
turning
on
the
toggle
switch
for
Headphone
Accommodations,
then
tap
Custom
Audio
Setup.
You
will
first
see
the
option
to
add
your
personal
audiogram
test
results.
These
can
be
uploaded
via
the
Camera,
Photos,
or
Files
app.
Put,
an
audiogram
test
shows
how
loud
you
need
sounds
to
be
in
order
to
hear
them.
If
you’re
not
interested,
hit
Don’t
Use
Audiogram
on
the
Add
an
Audiogram
screen.
Doing
that
will
prompt
you
to
go
to
the
next
step
of
the
process.
Here,
you’ll
listen
to
music
samples
and
pick
the
one
you
like
best.
You’ll
be
asked
to
repeat
the
test
with
different
samples.
This
part
determines
what
frequencies
you
like
emphasized
and
the
level
of
detail
you
want
in
your
music.
Once
you’re
done
manually
tweaking
your
music,
you
can
pick
an
automatic
setting
from
the
options
underneath.
These
allow
you
to
tune
your
audio
for
a
specific
quality
(balanced
tone,
vocal
range,
or
brightness)
and
pick
how
much
(slight,
moderate,
or
strong)
you
want
to
boost
the
soft
sounds
in
your
songs.
Screenshot:
Dua
Rashid
/
Gizmodo
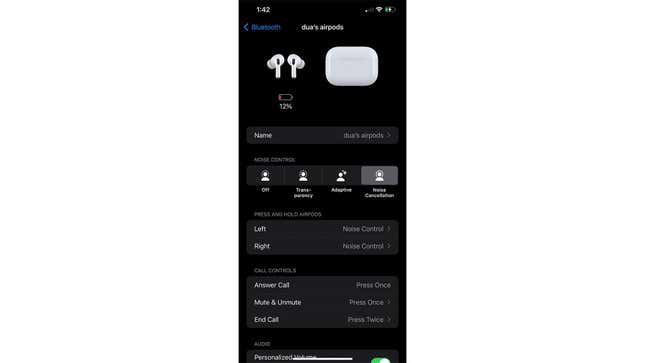
You
don’t
have
to
stick
to
your
AirPods’
out-of-the-box
touch
settings.
When
pressed,
you
can
change
what
they
do
by
going
into
Settings
>
Bluetooth
Settings
and
tapping
the
little
info
icon
next
to
your
AirPods.
Start
by
tapping
Left
and
Right
and
choosing
what
action
they
will
activate.
Your
two
options
are
Noise
Control
and
Siri.
Then,
navigate
the
Call
Controls
list
to
choose
how
to
mute/unmute
and
end
calls.
You
can
pick
from
Press
Once
(single
tap)
or
Press
twice
(double
tap).
The
options
here
are
pretty
limited,
but
it’s
still
a
helpful
feature.
Screenshot:
Dua
Rashid
/
Gizmodo
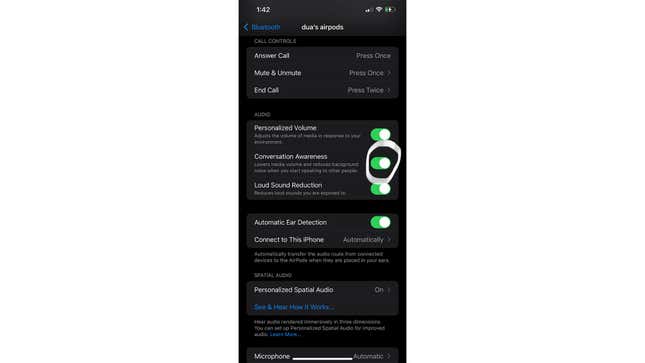
This
one’s
hidden
deep
in
Settings,
and
many
of
us
are
unaware
of
it.
Your
AirPodscano
automatically
lowers
the
sound
of
your
content
when
you
engage
in
small
talk.
To
get
them
to
detect
when
you’re
talking
to
someone,
navigate
to
Settings
>
Bluetooth
Settings
and
tap
the
little
info
icon
next
to
your
AirPods.
Scroll
down
to
Conversation
Awareness
and
turn
the
toggle
switch
on.


Comments